Drum Processing Basics
“Hey, how did you make that kick sound so punchy?”
Or
“Yo, that snare actually does not sound like shit! Sounds dope! How did you do that?”
This is a type of questions I get almost daily, for years now. From live sound mixing environments to various studio work.
I think it’s time to demystify drum processing once and for all with a simple method I call: “Pa.Bo.Cu.Bo.“
Yeah it sounds like a song for kids but I use this method for almost 20 years now and it never failed me. Over that time I was working with crappy drum recordings, terrible drum kits as well as high end drum recordings with masterful performers in A Class studios and it’s applicable in both situations.
Why?
Because it relates to fundamental EQ technique that will help you quickly shape any drum sound.
Pa.Bo.Cu.Bo. means:
- Pass
- Boost
- Cut
- Boost
When recording drums, every piece of drum kit (cymbals excluded of course) will have room rumble that you will want to deal with a high pass, fundamental root sound that you will want to boost, depending on drum tune it will have wood resonance that you will want to tame and finally it will have a drum stick (beater) punch point that you will want to emphasize.
See? Pass, Boost, Cut, Boost.
Here’s a super basic kick EQ scheme – and NO, this is NOT a recipe for kick EQ. There is NO SUCH THING as a EQ recipe, all you can get is a guideline like this and learn to recognize fundamental sound and adjust these settings based on situation, room size, kick size, dynamics, type of music that you are working on etc.
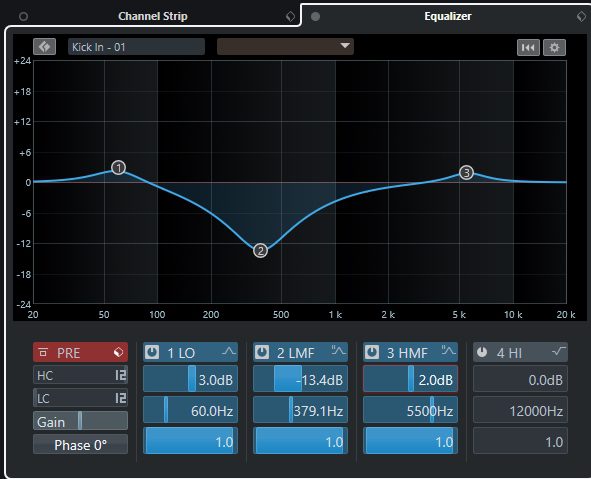
Band number one: Boosting fundamental sound
Band number two: Cutting out resonance – aka “boxy” kick sound
Band number three: Boosting beater punch sound
This is a super basic guideline and this is basically how approximately your EQ should look. BUT also BEWARE: don’t cut or boost anything unless you really need to. Some types of music like blues and jazz actually rely on things that are cut here. So listed first, listen hard and analyze.
Next thing after this would generally be compression but we will talk about that in depth in some other article but for now here’s a quick metaphor of what compression is in a meme form:

Honest to God I think this is the best way of explaining it if you are an absolute newbie. So let’s get back to kick drum:
- I’d suggest 2:1 ratio as a start. Think of it like this – higher the ratio the “clickier” it will get. (Compressors usually express ratio levels in decibels (dB). For example, with a compression ratio of 2:1, the input signal must cross the threshold by 2 dB for the output level to increase by 1 dB.)
- Attack of 5-10ms – someone will ask now “why not attack it right away if you want to have it punchy?” – Well I also want some of the fundamental sound to pass to actually have a kick sound not just clicky transient. If you are into death metal or super fast music writing then yeah go for 2-3ms.
- Release can be anything but I usually go for around 100ms+ you can also will rarely go if you just use auto setting on your plugin.
- Threshold – deeply depends on input signal and this is where you will move that value around to fine tune gain reduction that you want to achieve. I usually aim for not more than 3-4dbs of gain reduction. Someone may like to squash it more, but not me.
Now after reading this I’m sure that you will understand why I said before that there are now recipes for this. Like if someone was to say: “Hey take this cheat sheet, get these values and your kick drum will sound like this and that” – don’t believe it, it’s not possible. There are sooooo many factors at play there. For instance you may really want that fat Metallica kick and all you have is a muddy kick sample your friend gave you. No amount of twisting will get you that.
That gets me to the next point:
– If you are a beginner don’t be afraid to cut corners and use pre-produced samples or “all in one” drum solutions like this:
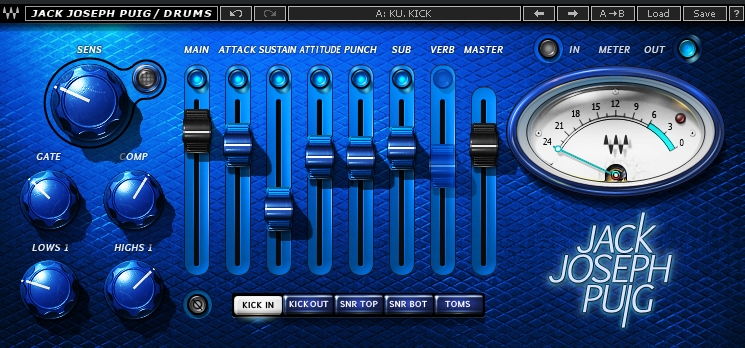
This is JJP plugin from Waves and it’s essentially several plugins combined into one. You got EQ regions and characteristic presented in simple terms like: sub, attach, Attitude, Low, High, etc. You got compressor and gate to control excess noise or beef that sound and SENS button that basically tells you how much gain reduction you are getting there. It’s a super nice tool for quick processing and I still use it a lot when I’m too lazy or on a deadline so I don’t have proper time to build a full surgical processing chain. Honestly if you have nice samples you don’t need much more than this or simple EQ carving that you can do with any stock EQ plugin.
Is there another way to do this?
When we were making JATAKUNA Drum Pack we used several mic positions to capture kick and why did we do that, well because we wanted to capture all different kick drum characters for people who prefer to use a different approach to kick processing and that is multi-track kick.

Now, what we see here are 3 channels grouped into a simple audio group called KICK. First channel is our kick in microphone, capturing that beater attack and inner kick sound, second one is Kick Out – microphone outside of kick drum capturing fundamental kick sound and the third one is Sub Kick – super large diaphragm mic capturing room low frequencies.
In essence you can make any type of kick sound by juggling these 3. Anything from boxy blue kick sound – emphasizing kick out and sub to clicky Slipknot sound by emphasizing Kick in and super compressing the main KICK audio group.
I’m sure you can see the potential of this method. Here are some raw kick audio examples to play with:
Keep in mind that you can use this to capture and download any sample mix here so consider this a freebie from us. All samples are from above mentioned JATAKUNA Drum Pack you are welcome 😀
Of course I can’t emphasize enough these are just basics, we will talk about all this more in depth.
Now let’s get on snare, toms and cymbals.
Snare
Similar to kick Pa.Bo.Cu.Bo. method is applicable on snare too. And here’s the simple image explaining a few EQ regions there.
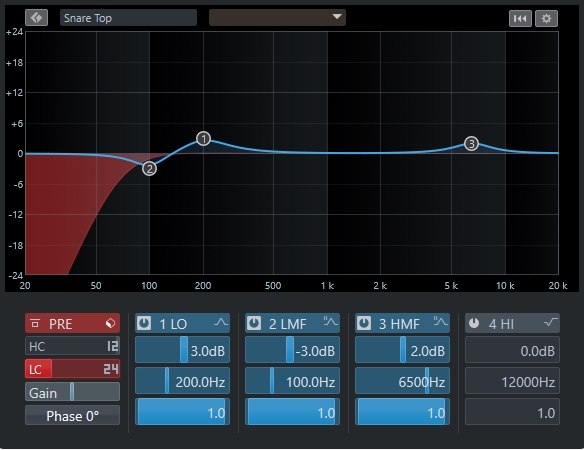
You can see that here again we have LC (low cut or high pass – the same thing) to remove that kick bleed in snare recording. If you are working with pre-produced samples that will be already cleared out of course.
Band number one: Boosting fundamental sound around 100 to 250hz
Band number two: Cutting out resonance – that can happen around fundamental frequency like shown here but in most case it will happens somewhere around 1khz where snare rim ringout dwells. If you are Metallica – St. Anger fan, you will love that ringout of course 😀
Band number three: Boosting stick punch sound that can happen somewhere in high mid depending on snare size, depth, stick size and thickness as well as players dynamic.
For now I will stay out compression because I REALLY want to make super detailed article on that and since this is just an entry type article I really just want to stick to the overview. Honestly that compression tip I gave for kick is a good starting point here too. You can also try JJP here as well cause that plugin has some really nice preset patches to help you start.
Toms
Similar thing will happen to rack toms, while floor tom I tend to tune almost like kick – I’m an old metalhead so that suits me. Here’s a rack tom EQ example:
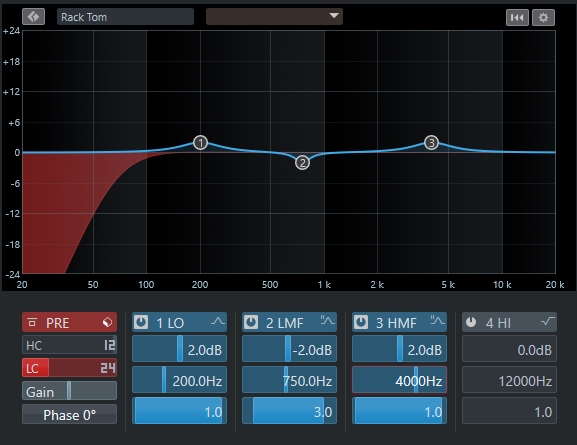
There we go again Pa.Bo.Cu.Bo. It just fits as a base on every component. I will leave you this one to analyse yourself based on examples above. Similar startup compression principals can be applied too.
Cymbals
And now the last thing I want to mention are cymbals. Capturing drum overhead sound with in a proper way in a nice room is probably hardest thing that you will ever have to do drumwise. It’s apsolutelly crucial to final drum sound. Huge part of drum sound is room and since we are dealing with pretty dynamic instrument it’s a super hard thing to capture. Again it all greatly depends on music style. While if you like Beatles you are loving that roomy drum sound recorded with just a few mics in Abbey Road, capturing room and drum sound in a beautiful, subtle way. On the other hand if you are Guns and Roses fan you will love to hear that room combined with huge reverbs and super packed punchy drum sound.
Here’s the basic overhead scheme:
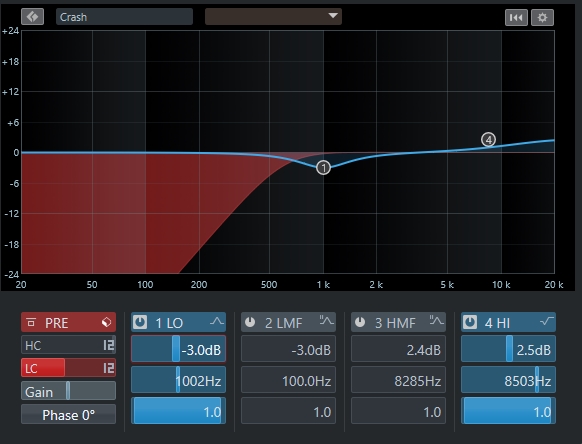
You can see that here again we have pretty big high cut. We really want to remove as much room rumble created by intense drum playing as possible.
Band number one: Here we want to try and find snare punch and possibly cut down on it a bit. Ironically snare is going to be the most present thing in your overheads cause it is cutting so much better through mids comparing to cymbals. And mids are something that we are registering the most as human beings.
Band number four: Boosting fundamental cymbal frequencies.
Handling overheads in proper way will make your drums sound huge and powerful. They give life to your drum sound and are there to connect all your drum parts for the listener. It’s really important to give them enough space and that brings me to the next fundamental drum processing tool:
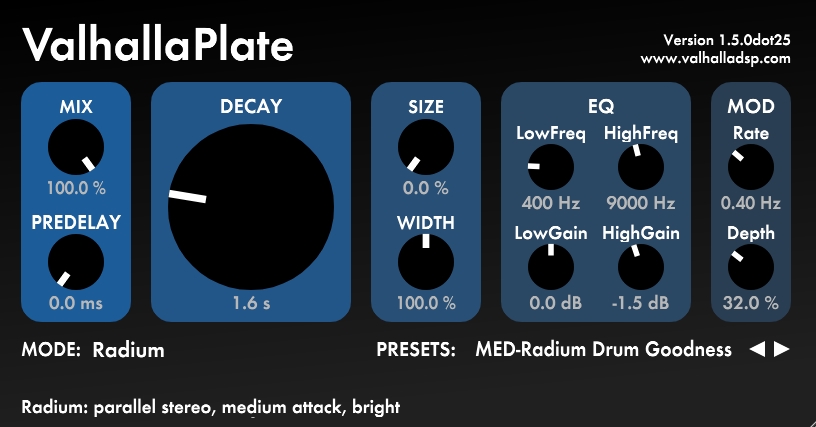
REVERB
You don’t have to be a musician or producer to know what reverb is. Anyone had a chance to stand in a tunnel or big spacious room and say something. Or perhaps you are big fan of Whitesnake and you love that huge snare sound with reverb ringing out to eternity!
When you are using drum samples you will need a few magic tricks to place all those elements in the same space so listener can actually hear your track and feel as if those drums are coming from the same room. Here is where reverb is you friend. This is just one of many many many usages, and will will talk about it a lot! On the other hand while it can make things sound bigger and glorious it’s so easy to overdo ending up with smudged and muddy track so beware! Use it with care!
Again the BEST advice I can give you here is: use it with taste – don’t over do it unless you are aiming to get some sound design element out of it. You will get into many discussions about which one is “the best” one – don’t be guided by that – when you hear super ugly reverb you will know, mud is easy to spot. There are many out there. If you stay tuned I will do a proper in depth article on reverb soon so you can really get into it. You can also get a great and cheap e-book from Joël Dollié. He as an awesome mixing engineer and even though this book is about orchestral mixing it has a really nice few chapters on reverb, explaining a LOT of thing really well.
Now I will the breaks and stop here cause I think this is quite enough for introduction drum processing post. We will continue this next week. Meanwhile don’t forget to sign up for our newsletters and get these thing in you inbox.
And here comes a shameless sales pitch of course, like you’d expect 😀
If you feel like already starting your drum processing and drum building journey do check out our Jatakuna Raw Drums sample pack. Pack has over 300 samples beautifully recorded with and awesome SSL 4000 console. All samples are available as RAW – you can fully manipulate them and as MIXED – meaning we already did some mixing variations for you. You can get it solo or as a part of our ALL BUNDLE.
Check out!
Until next time,
Stay safe, stay creative
Marko